Categories
Decorating, Home Owners, Seller StrategiesPublished April 24, 2026
How to Prepare Your Home for Listing Photos (Seller’s Checklist)

.jpeg)
How to Prepare Your Home for Listing Photos (Seller's Checklist)
When most buyers start looking for a home today, they aren't driving around neighborhoods. They're scrolling. They're sitting on the couch with their phone, clicking through listing after listing, deciding in seconds which homes are worth seeing in person. Because of that, listing photos play a huge role in whether buyers choose to schedule a showing or skip a property entirely.
As real estate agents, we help sellers prepare homes for listing photos all the time. One thing we've seen repeatedly is that even small preparation steps can dramatically improve how a home appears online. Done right, great photos bring more buyers through the door. Done poorly, they can quietly cost you showings, offers, and potentially thousands of dollars.
The good news is that preparing your home for listing photos isn't complicated. Most improvements come down to simple steps: decluttering, cleaning, improving lighting, and arranging spaces so they photograph well.
In this guide, we'll walk through exactly how to prepare your home for listing photos so it looks brighter, cleaner, and more spacious online, helping attract more showings and stronger buyer interest.
What Should You Do Before Real Estate Photos?
Preparing your home for listing photos usually comes down to a few simple steps: decluttering surfaces, removing personal items, cleaning visible areas, maximizing natural light, arranging furniture to highlight space, and tidying the exterior. These small changes help your home look brighter, cleaner, and more spacious in photos, which can attract more buyers to schedule a showing.
Before diving deeper into each step, here's a quick checklist sellers can follow before listing photos are taken.
Quick Checklist: Preparing Your Home for Listing Photos
To prepare your home for listing photos, focus on these key steps:
- Declutter surfaces such as countertops, tables, and nightstands
- Remove personal items like family photos and memorabilia
- Clean visible surfaces, floors, and sinks
- Turn on all lights and open blinds or curtains
- Arrange furniture so rooms feel open and spacious
- Tidy the exterior and move cars or trash cans out of view
Why Listing Photos Matter More Than Ever
Every home search starts online.
Buyers scroll through dozens of listings at a time, quickly clicking through photos and deciding which homes feel worth visiting. In that process, the photos are the very first filter.
If the photos look dark, cluttered, or poorly framed, many buyers won't even read the description. They'll simply keep scrolling.
In fact, the first few photos of a listing do most of the work. Those opening images create the first impression that convinces buyers to keep exploring the listing, or to move on to the next one.
Great photos, on the other hand, do exactly what you want them to do: they get more people through the door. And the more buyers who see your home in person, the stronger your chances of receiving competitive offers.
Listings with high-quality professional photos receive significantly more online views and showings than listings with poor images.
What Happens When Listing Photos Are Poor
Sometimes homes go on the market with photos that are clearly rushed or poorly prepared. Maybe they were taken on a phone, maybe the lighting is dark, or maybe the house is cluttered.
When that happens, two things typically occur.
First, buyers may skip the listing entirely. If the photos don't look appealing, many people assume the house itself isn't appealing either.
Second, over-edited photos can create the opposite problem. If images are heavily filtered or unrealistic, buyers may show up expecting something completely different. When the home doesn't match the photos, disappointment sets in and offers often don't follow.
There's also a third issue sellers sometimes overlook: listings with very few photos. When buyers see only a handful of images, they often assume the house must have problems the seller doesn't want to show.
In reality, the home may be perfectly nice, but without quality photos, buyers may never give it a chance.
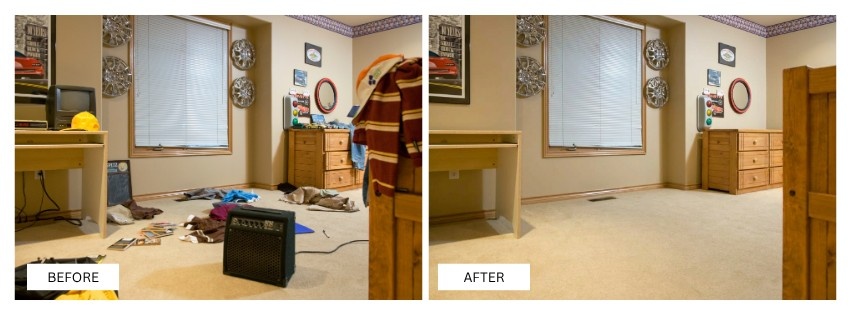
Declutter, Depersonalize, and Clean Your Home Before Listing Photos
The single most important thing you can do before listing photos is declutter.
Clutter distracts buyers from the home itself. Instead of seeing the layout or the space, their eyes get pulled toward everyday objects scattered throughout the room.
This is especially noticeable in kitchens and bathrooms. Items like soap bottles, toiletries, and small appliances tend to draw attention in photos. Even when buyers don't consciously care about those items, their eyes go straight to them.
Before the photographer arrives, aim for clear surfaces wherever possible:
- Kitchen countertops
- Bathroom counters
- Dining tables
- Coffee tables
- Nightstands
You don't need to remove all furniture, in fact, furniture helps buyers understand how a room is used. But removing excess items helps the home feel cleaner, brighter, and more spacious.
Another important step is depersonalizing the space.
Buyers need to imagine themselves living in the home. When a room is filled with personal items, such as family photos, political materials, or religious displays, it can pull buyers out of that mindset.
Family photos are the most common example. While they're meaningful to you, they can unintentionally remind buyers that they're walking through someone else's home.
It's usually best to remove:
- Family photos
- Personal memorabilia
- Political materials
- Religious displays
- Highly personalized décor
The goal isn't to make the home feel empty, it's to create a neutral, welcoming space that appeals to the widest range of buyers.
Your home doesn't necessarily need a top-to-bottom deep cleaning, but it absolutely needs to look clean.
Surface cleaning alone goes a long way. Dust, crumbs, or obvious dirt can easily show up in photos and make a home feel less cared for.
At a minimum, make sure to:
- Vacuum floors and carpets
- Remove pet beds and bowls
- Clean visible surfaces
When a home looks clean and well maintained, buyers often assume the rest of the property has been cared for as well.
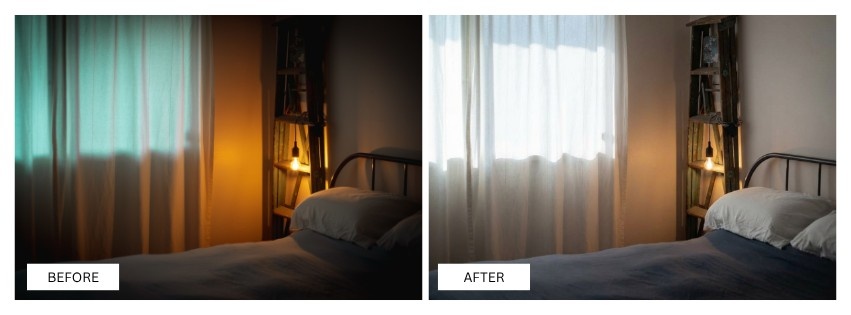
Use Lighting to Your Advantage
Lighting makes a dramatic difference in listing photos.
Dark rooms tend to feel smaller, less inviting, and less appealing online. Bright spaces, on the other hand, immediately feel more welcoming.
Before the photographer arrives, make sure to:
- Turn on all interior lights
- Open curtains and blinds
- Let in as much natural light as possible
If a room doesn't have overhead lighting, consider adding lamps to brighten the space. Natural light combined with interior lighting helps rooms look warm, open, and inviting.
Even small lighting adjustments can dramatically improve the final photos.
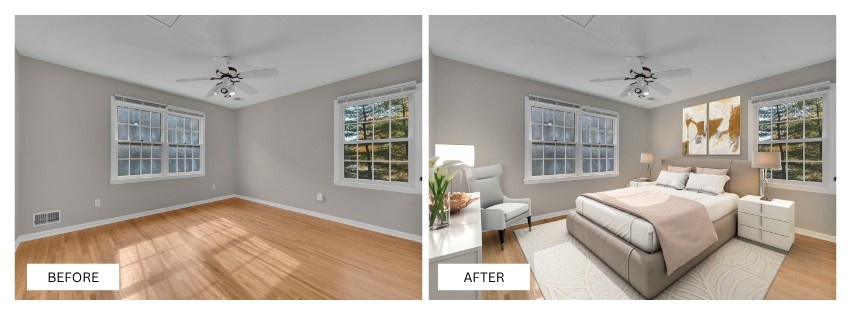
Arrange Furniture to Highlight Space
You don't need professional staging to make your home look great in photos. Most of the time, the furniture you already have is enough. And if certain rooms are empty, tools like virtual staging can sometimes help buyers better visualize the space.
The key is to arrange furniture in a way that highlights the space instead of crowding it. Rooms filled with too many items can look smaller in photos. Large toys, oversized furniture, or crowded seating areas can distort how big the room actually feels.
Instead, try to create simple layouts that show how the space can be used while leaving room to move around.
Think of it less as decorating for daily living and more as creating a layout that helps buyers easily picture themselves using the space.
Don't Forget the Kitchen
If there's one room buyers pay the most attention to in listing photos, it's the kitchen.
Kitchens are often the centerpiece of a home listing, so they should look as open and clean as possible.
Before photos:
- Remove small appliances from countertops
- Clear magnets and papers from the fridge
- Wipe down surfaces
- Remove dishes from the sink
The goal is to create a clean, spacious look that allows buyers to focus on the cabinets, counters, and layout, not everyday clutter.
Boost Your Curb Appeal
The exterior photo of your home is often the very first image buyers see.
That means curb appeal plays a huge role in whether someone clicks on your listing in the first place.
Before listing photos, take a few simple steps to clean up the exterior:
- Move cars out of the driveway and away from the front of the home if possible
- Hide trash cans
- Tidy the lawn or shovel snow if needed
- Arrange patio furniture neatly
- Open patio umbrellas or outdoor seating areas
If you have a nice yard, wide street, or outdoor space, those elements should be highlighted in the photos.
Many buyers move to certain neighborhoods specifically for the outdoor space, so it's worth showcasing.
.jpg)
Do a Final Walk-Through Before the Photographer Arrives
Right before the photographer arrives, take a few minutes to walk through the house as if you were seeing it for the first time.
Look for small things that might appear in photos:
- Coffee cups on counters
- Shoes near the door
- Coats hanging on hooks
- Dishes in the sink
- Items left on bathroom counters
These small details are easy to overlook, but removing them can significantly improve the final photos.
Should You Stage Your Home for Listing Photos?
Staging can sometimes make a home look more polished in listing photos, especially if rooms are empty or furniture layout makes spaces feel smaller. However, it's not always necessary. If your home is already clean, decluttered, and has simple furnishings, it will often photograph well without professional staging.
In many situations, virtual staging can be used to digitally add furniture to photos. This helps buyers visualize how the space could look without the cost or effort of bringing in physical staging furniture.
Why It's Best to Leave During the Photo Shoot
Once the photographer arrives, it's usually best for sellers to step out of the home.
Photographers are trained to capture rooms from the best angles and to notice details you might overlook. Because they're seeing the house for the first time, they often have a more objective perspective about what looks best.
Leaving also allows them to move freely between rooms and work more efficiently.
Most listing photo sessions are fairly quick (around 30-45 minutes), and giving the photographer space helps ensure they get the best results possible.
Take Listing Photos Seriously, It's Worth It
Preparing your home for listing photos can feel like a chore. It takes time to clean, declutter, and organize everything. But the return on that effort can be huge.
Those photos are how buyers experience your home for the very first time. If they create a great first impression, more buyers schedule showings. And more showings often lead to stronger offers.
In other words, the hour or two you spend preparing your home could have one of the highest returns of any step in the selling process.
Download the Listing Photo Preparation Checklist
Preparing your home for listing photos doesn't require a major renovation or expensive staging. In most cases, it comes down to a few simple things: decluttering surfaces, removing personal items, cleaning thoroughly, improving lighting, and arranging furniture so the space feels open and welcoming.
Because listing photos are often the very first impression buyers have of your home, taking the time to prepare beforehand can make a big difference in how much interest your home receives once it hits the market.
If you're getting ready to sell, we've created a simple checklist that walks you through exactly how to prepare your home before listing photos are taken.
Download the Photo Preparation Checklist so you can make sure nothing gets overlooked before your photographer arrives.
And if you're planning to sell in the next few months, we'd also be happy to walk through your home with you and help you prepare it for listing photos, showings, and the market.
Our goal is to make sure your home looks its best from the very first photo buyers see.
Frequently Asked Questions About Listing Photos
Do you need to stage your home for listing photos?
Not always. If your home is clean, decluttered, and arranged well, it will often photograph nicely without professional staging. In many cases, virtual staging can also be used to digitally add furniture to empty rooms so buyers can better visualize the space.
How long do real estate listing photos usually take?
Most listing photo sessions take about 30–45 minutes, depending on the size of the home and the number of rooms being photographed.
Should the lights be on for listing photos?
Yes. Turning on all interior lights and opening curtains or blinds helps make rooms appear brighter, warmer, and more inviting in photos.
Should sellers leave during listing photos?
It's usually best. Photographers can move more freely and work more efficiently when the home is empty.
What rooms should be included in listing photos?
Most listings include the kitchen, living room, primary bedroom, bathrooms, exterior, and any unique features like outdoor spaces, home offices, or finished basements.
Should you hide cords, trash cans, and small appliances before listing photos?
Yes. Small everyday items like visible cords, trash cans, paper towels, and countertop appliances can distract from the space in photos. Removing or hiding them helps keep the focus on the room itself rather than the objects inside it.
Do you need professional photography for a home listing?
In most cases, yes. Professional real estate photographers use specialized lenses, lighting techniques, and editing tools that help rooms appear brighter, more balanced, and more spacious. Listings with professional photos typically attract more online views and showings than listings with basic phone photos.

Robin Martin
Realtor® | Premier Home Team | Keller Williams Empower | PLACE
or another way